UPDATE May 2023: well, I've split this from E-mail provider reviews since it has nothing to do with those. So, here you will learn how to set up SSL in Claws Mail and also why you sometimes (always :D) might need to go further and get into PGP; and then learn that, as well. Maybe I will expand this with other settings later. Oh, and we're using Claws Mail because it's simply the best client, and the only one I'm really familiar with.
First of all, ensure your mail is sent using TLS since some providers actually don't support that. For those that do, there are two settings that determine how it's used - STARTTLS or SSL / TLS - and the former is insecure. Briefly: for SSL / TLS, the mail is encrypted by default for its full journey; if TLS is unavailable at the other end, the mail is dropped. STARTTLS, on the other hand, first sends an unencrypted packet to check if the other server supports encryption, and only upgrades the connection if it does. A downgrade attack can be performed by any man in the middle by modifying the server response (archive) (MozArchive) to make it seem like it doesn't support TLS. STARTTLS is actually a historical relic whose point was to upgrade insecure connections from an age before TLS even existed. Later, the port number 465 was defined to support only encrypted connections, so that is the one that clients should be configured to use to prevent MitM attacks. Of course, this will disallow sending mail to providers which don't support encryption, but pretty much every relevant server (archive) (MozArchive) does today.
Now, SSL / TLS still has many of its own issues. Any of the points inbetween you and the recipient can try to perform a Man in the Middle attack (just as an example - a connection to mail.riseup.net takes 22 hops). The protocol usually protects against those by requiring the server to prove itself with a digital certificate. However, SSL validation can be broken in many ways (archive) (local). Even if the above don't apply - all software that uses the protocol has an in-built list of certificate authorities that it trusts by default. If a hacker takes over one of those, they can generate fake certificates (which your program will automatically accept) for the servers they want to capture traffic from. This allows them to see request content, steal passwords, forge responses (archive) (MozArchive), etc. for the spoofed providers (such as Google's in the above case). Another way to perform a MitM is by installing a rogue root cert on the target's machine - this is done by both corporations (archive) (MozArchive) and governments (archive) (MozArchive) - and is in fact also how you can spy on your own browser's HTTPS traffic. Even without a MitM, both yours and the recipient's servers can still see everything, including message content in regards to E-mail. How do we protect that? Enter PGP:
PGP, or Pretty Good Privacy, is a way to locally encrypt your E-mail before sending it to other people, as well as allow receiving encrypted messages yourself (it can do more, but since this is the E-mail report, we will focus on just that). This hides them both from possible MitM as well as compromised servers. To take advantage of this tool, you first need to create your PGP key. Claws Mail can do this through its PGP plugins - but it's limited to the less secure 2048 bit key length - so we'll do it from the command line. First, install the necessary packages - gnupg2 and pinentry. Now type this command:
gpg2 --full-generate-key
Select RSA and DSA for key type (option 1). 4096 for size - this is the highest possible value, and the most secure. To make using PGP easier, we will create a key that never expires - option 0; otherwise, you'd need to generate and share new public keys every so often. Press Y to confirm all the chosen options. Now, it will ask you for your real name - however, we - being the privacy ninjas - don't share personal details on the Internet, so type something like Totally Real
, or whatever nickname you usually use. Then type your real E-mail address, and finally confirm everything by pressing O. Now choose a strong password - but also one you will remember. This is very important - if you forget it, you won't be able to decrypt the messages sent to you. On the other hand - if it's weak (either too short, made up of common words, or personal details like birth dates) - it increases the possibility of cracking.
You've now managed to create two keys - public and private. The former allows other people to send encrypted messages to you. You're supposed to share the public key either through your website, a keyserver or directly with the people you talk to. The private key is used to decrypt messages others send to you, as well as sign your own (which proves they have come from you). As its name suggests, you're not supposed to share it and in fact should protect it as best as you can. Without it, you won't be able to read the E-mail that's been encrypted with your public key, and will have to generate a new key pair. Worse than that - if a hacker steals it and is able to guess your password, they will be able to spy on your mail and even forge signatures; at which point you'll likely need a new account. To export your public key, type this command:
gpg2 --export --armor [email protected] > mypublickey.asc
Of course, the E-mail address has to be the same one you've given during the key creation process - otherwise, GPG won't know which key to export. Now, you can safely put that file on your website, upload to the keyserver, or give to your contacts directly (easiest by sending them an E-mail with the public key attached). This is enough for people to be able to send you encrypted messages. To read them, you first need to load the necessary Claws Mail plugins (in some distros, this might require a package such as claws-mail-plugins to be installed first):
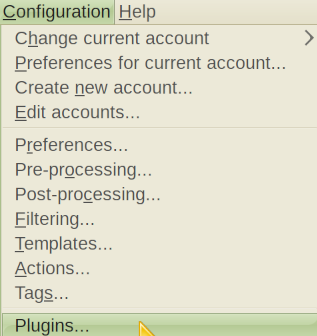
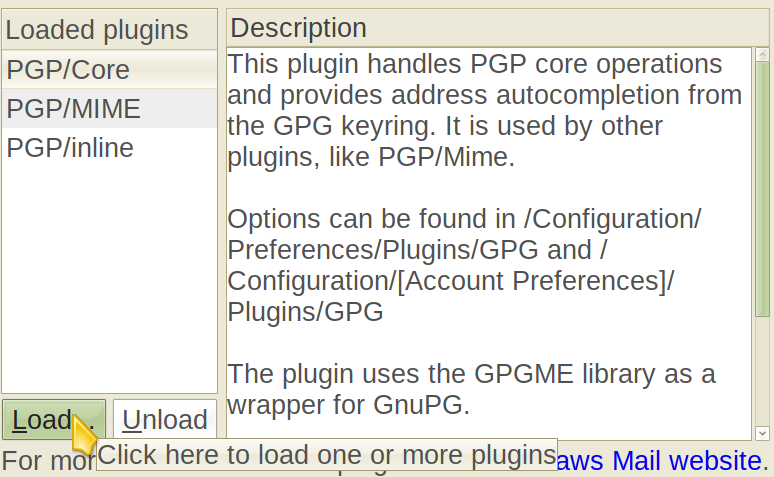
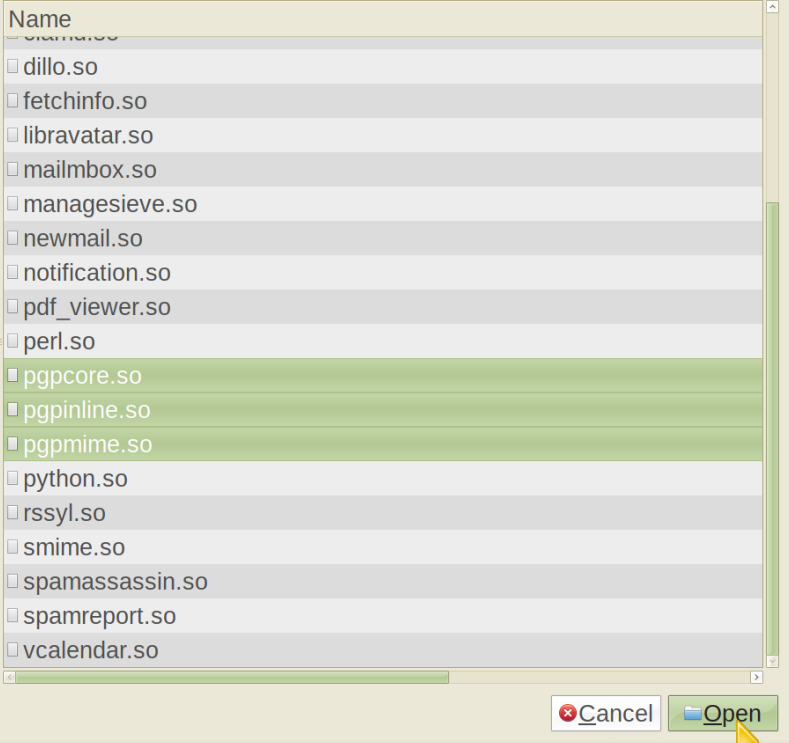
PGP Inline is insecure (archive) (MozArchive) and shouldn't be used - however, you will need it if someone sends you an E-mail encrypted with it. Now click on the encrypted message and a prompt for your private key password should appear. Enter it and the message will display. To encrypt back, your contact must first generate his own PGP keypair (with the process described above, for example) and send his public key to you. Then you import it with this command:
gpg2 --import recipient_public_key.asc
Now mark the necessary options in the Compose (or Reply) window and click Send:
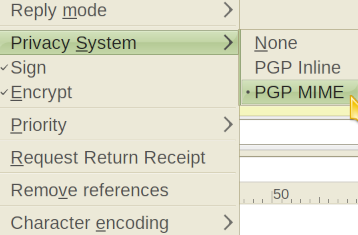
Signing ensures your recipient that you're not being impersonated (only someone who knows your private key password could have signed a message with that key) and that your message has not been modified by a MitM (in that case, signature verification will fail). Technically, you can encrypt without signing (or sign without encrypting) - but for better security, you should do both. Of course, for the signing to matter - you need to verify out of band that the key that's been used to sign the message actually belongs to the person you think you're communicating with. This means you need another trusted channel such as a website that you're sure is hers; or the best way - in person. Anyway, GPG has much more functionality than this - but I think I've covered everything needed for basic usage (and you can always learn more on your own).
There are various ways to implement encryption in webmail, and many providers use them as a strong marketing point, but none of those are as strong as PGP proper, so we will ignore those (if you want, you can read up). PGP still has flaws - for example, it does not encrypt the headers; this includes the subject, sender, recipient and others - you can see all the headers in your mail client; it is all the stuff above the actual message. There have been analyses done (archive) (MozArchive) on just how much information can be revealed without even knowing the message contents; the results might astonish you:
But we see that even our not very sophisticated, DIY methods, enabled us to create a deep and clear image of someone’s habits and activities, using information extracted from ‘only’ email metadata. Although our investigation primarily discovered relations, patterns and anomalies of someone’s work life, it still gave us an insight into that person’s habits that border with private life.
But this is not even necessarily required, since an actual attack on PGP called EFAIL (archive) (MozArchive) has recently surfaced; it needs the attacker to have:
access to the encrypted emails, for example, by eavesdropping on network traffic, compromising email accounts, email servers, backup systems or client computers.
For clarity's sake - Claws Mail was immune to the attack - so the situation wasn't that bad. Still, it shows you shouldn't put all your privacy eggs in one basket. Despite the attack, PGP is still fucking awesome and should always be used for any sensitive communication (best case scenario: all for every contact you can get to use it) - in addition to secure providers and all the other stuff we should be doing.
This section has been written by Noctilucent. The Windows port of Claws Mail can also be used successfully for encrypted communication. Unfortunately, this version has a tendency to freeze during its built-in GPG key generation procedure (looks like a bug), and as Dig Deeper already mentioned, the keys obtained this way wouldn't have satisfied the highest security requirements anyway. The usual CLI/TUI method is unavailable for this OS, but luckily there is another solution - the Gpg4win package. It includes all the necessary tools: gpg-agent (private key daemon), gpg.exe and two certificate managers - the more traditional GNU Privacy Assistant and its modern alternative Kleopatra, which is also part of KDE project. I will use the latter to demonstrate the key generation process under Windows.
After you're done with installing and configuring Claws Mail, download and install Gpg4win (you may also want to check the executable's integrity (MozArchive)). Launch Kleopatra and press the New Key Pair
button. The key generation procedure is similar to what's been described above for Linux, but this time we are using GUI. Enter your nickname into the Name
field - which can be left empty, but keep in mind that some keyservers may refuse to host completely nameless keys. Don't forget to specify your e-mail address, for which you intend to use GPG. Now press the Advanced Settings...
button. Set your new key's details as shown below - RSA + RSA; both 4,096 bits in size; for signing, encryption and certification. Remove the check mark in front of Valid Until
so that the key won't expire.
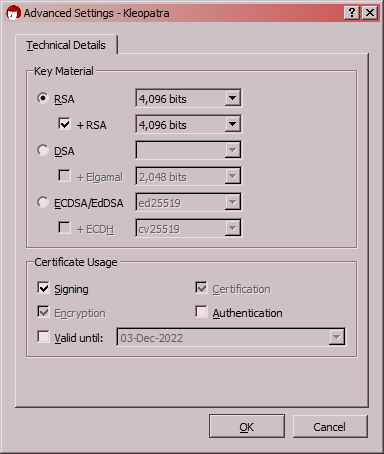
Press OK to confirm the advanced settings. Don't press Next
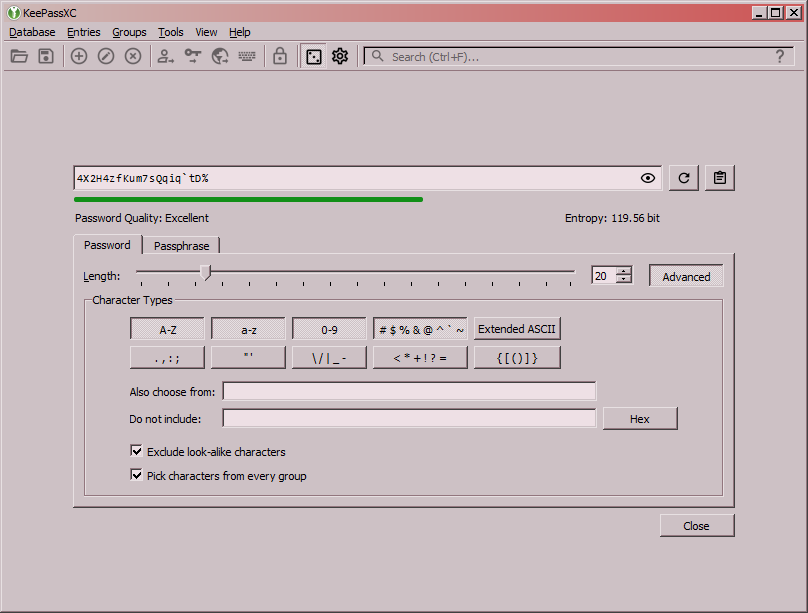
yet in the main dialog - now is the time to create a reliable password. Follow the advice given in Dig Deeper's main guide - or you can rely on a password manager such as KeePassX or KeePassXC. This software allows you to generate extremely durable passwords (or passphrases), that you won't have to remember at all - instead, they are stored locally in a database file, which is protected by a master password. Said password is the only one you will have to come up with and remember yourself. Be sure to keep the database file and the device it is stored on far away from the malicious types. Despite the added hassle, this method has an obvious and significant advantage - the randomly generated passwords can be extremely long and complex, providing strong protection from cracking.
During the next step Kleopatra will ask for your new password - enter it yourself or copy the generated one from your password manager and confirm. This will start the key creation process proper, lasting a few minutes. Once finished, Kleopatra will display a new entry in its main window, listing your new key pair. To export your public key, right click on said entry and select Export...
- save the file to a desired location, now it's ready to be shared. Exporting your secret / private key (option immediately below) will require entering the password you've just created. Do not store the exported copy of your secret key on the same device where you use it - it's unnecessary and potentially dangerous. Gpg4win will automatically activate this key as needed - when you decrypt incoming and sign outgoing messages. Instead, export your secret key as a backup on a removable drive.

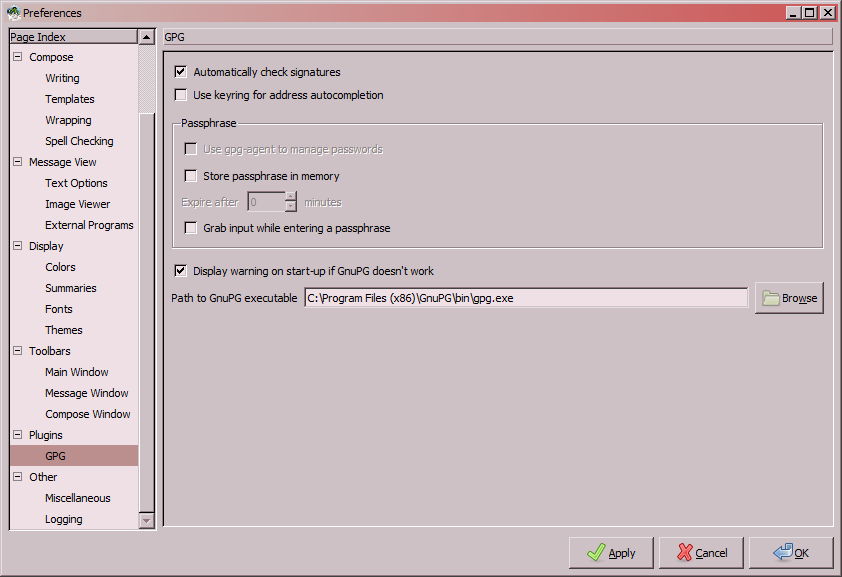
Now let's hook up the GPG system to Claws Mail. As stated above, first you'll need to enable the three plugins - PGP/Core, PGP/MIME and PGP/Inline. After that, go to Preferences and specify the path to gpg.exe:
Also check your settings in Preferences for current account -> Plugins
, where GPG and S/MIME must be set to select the sign key based on your email address.

This concludes the initial setup of GPG for Windows. Once you share your public key, you will be able to receive encrypted messages, just like in Linux. The system will automatically ask for your password whenever you click on incoming messages marked with a little key icon. If you are using a password manager, launch it and open the database with your master password. Copy your GPG password from the database and paste it to decrypt the message. In order to send your own encrypted mail, just import any public keys you may have to Kleopatra - double click on the file and confirm. Don't forget to tick off the necessary options before sending: Sign, Encrypt, Privacy System - PGP MIME. Because of the way PGP works, you won't be able to read any encrypted messages you sent - that's because you don't have the matching secret key - only the recipient has it. Thus the Couldn't decrypt: Decryption failed
error in this case means that, in fact, you did everything right. If you think you might forget whatever you wrote in that message you encrypted, the option "Reply will quote by default" may help if enabled on both ends. You can also encrypt sent messages with your own key pair in addition to recipient's, which will allow you to re-read them later (this will also ask for your password of course, just like with the incoming messages). This is arguably the best approach. Storing clear text (unencrypted) copies of outgoing messages is the least secure option available. The actual messages you send will still be encrypted, so in theory this doesn't have adverse effects on security - but it will definitely require ensuring that nobody else can access these copies and the device they're stored on. You can find the last two options under Preferences for current account -> Privacy
.

In Preferences -> GPG, you need Use gpg-agent to manage passwords
marked. Then, edit the file /home/username/.gnupg/gpg-agent.conf and insert there:
no-grab
default-cache-ttl 3600
The 3600
is the amount of seconds (adding up to one hour) your PGP key password will be kept in memory so that you don't have to retype it if you want to send multiple encrypted messages. I cannot make this work any other way, such as through the Store password in memory
option; but maybe it's possible. I find that the other ways still make you input the password every time; this works for sure though.
In account settings (Configuration -> Edit accounts -> pick an account -> Edit), Send category, you need this:

And in Basic:

This is the only way (that I can find) for Claws Mail to ask you for the password during sending only once per session. Otherwise I can only make it not ask at all (insecure against physical attacks), or ask every time (tiring and pointless), or just get rejected from the server with the Not logged in
error (retarded).
Claws Mail - by default - reveals your timezone to message recipients. This can narrow down the country you're in, or at least the continent. To get rid of that, edit the file /home/username/.claws-mail/clawsrc and change the value of hide_timezone
to 1
(or insert hide_timezone=1
anywhere if it doesn't already exist). This doesn't fully prevent the leak, just changes the revealed timezone to GMT. Claws Mail also tells of its usage through the X-Mailer header, which can be disabled by unchecking the Add user agent header option. Your operating system can also get leaked by this header, so it's better to turn it off.
If you want a new account to use a separate mailbox, you need to set all the folders specifically in Configuration -> Edit accounts (now pick the account) -> Edit -> Advanced. Just picking another mailbox in Receive doesn't work and will make Claws mix up your mail from different accounts, which is quite annoying. Of course, the mailbox needs to exist in the first place.
